Legacy Code Modernisation - Conserving Behaviour with Approval Tests
Transitioning legacy code to Hexagonal Architecture requires a strong test suite. Approval Tests are a powerful tool to achieve this.
Why Legacy Code Needs Tests
Refactoring means changing the internal structure of the code without changing its observable behaviour to make it easier to understand and cheaper to modify (Martin Fowler).
We thus need to refactor code continuously to remain able to save or make money for our business. If maintaining or changing our code makes us lose money, refactoring it can have many advantages over rebuilding it from scratch as the business knowledge is already there, it just needs to be brought back to light.
However, to be able to refactor code effectively without potentially introducing bugs while doing so, we need a strong set of effective and preferably fast, tests.
Legacy code typically lacks sufficient test coverage to refactor effectively. If it had, it would not be considered legacy code, as it would allow for frequent, cheap changes.
Thus, we need a way to test legacy code without falling into analysis paralysis or potentially introducing bugs while improving its design.
A proven solution to this problem are so-called Pin-Down-, Characterisation-, or Approval Tests: quickly written, fast throwaway unit tests that pin the current behaviour in place while avoiding the mental overload and structural problems of writing “real” unit tests for legacy code.
This test harness then becomes the insurance for refactoring the code and improving its design incrementally, avoiding costly rewrites in the process.
In this article, I want to focus on writing Approval Tests manually to understand the concept and have a technique at hand that requires no additional dependencies, which can be useful for small legacy methods.
In future articles, I will introduce some useful libraries that build on this knowledge but automate a lot of the manual steps, helping pinning down behaviour of larger legacy methods with lots of input parameter combinations.
Testing Legacy Code with Approval Tests
You can try it out yourself in the following codebase.
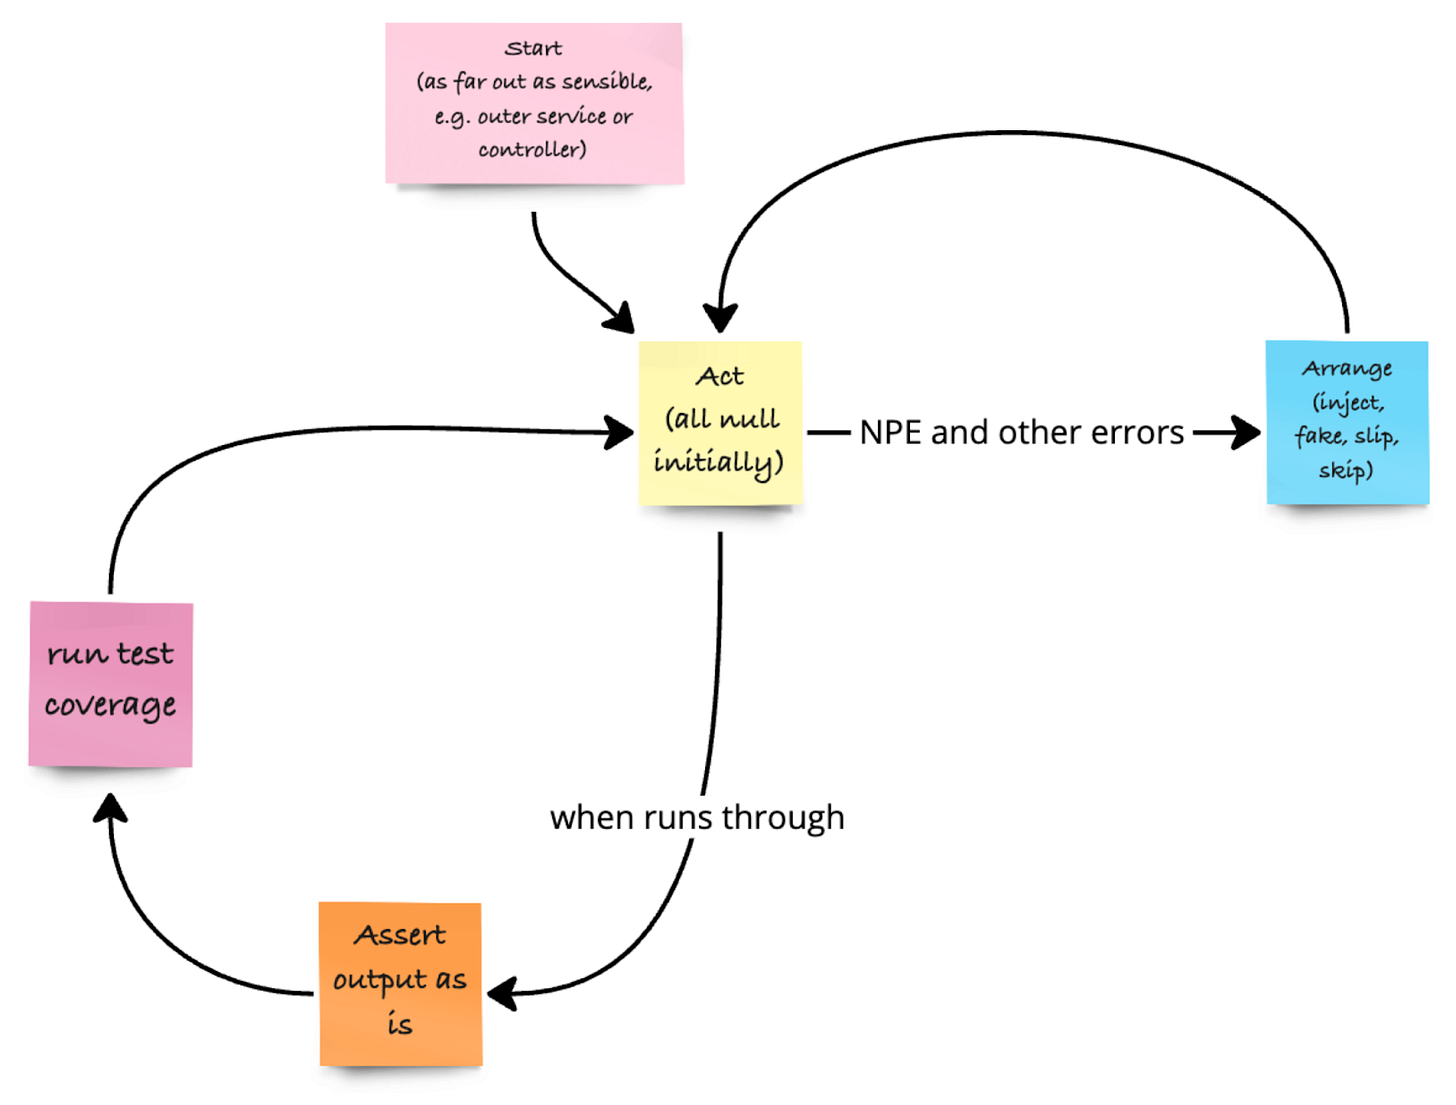
There are 5 steps to manually writing Approval Tests (remember DAAARt 🎯):
Define: what method should be tested
Act: call the method under test
Arrange: add missing dependencies
Assert: the state of affected object as string
Run test coverage: to see what branches have not been covered yet
Defining Appropriate Methods to Test
We want to start as far out as possible, for example with a REST controller or a use case service method, so that we cover as much code as possible with one test and don’t end up tying our code to our test. This means many classes may possibly be tested together.
I typically create a unit test that ends in “ApprovalTestShould” to indicate its purpose, for example ParkingSpotReservationApprovalTestShould.
Acting and Arranging
We start by creating a unit test that simply instantiates the class containing the method, and pass all parameters to the constructor or method as null.
Then we run the test. This inevitably will lead to null pointer exceptions (NPEs) and other errors, which we need to fix, typically by injecting the required dependencies step-by-step.
We choose to inject as much production code from our own codebase as possible, and only resort to injecting test doubles (“mocks”) for awkward dependencies.
Awkward dependencies are those that are slow or non-deterministic. Typical examples include:
I/O
Database
Filesystem
Random Number Generator
Time
We continue acting and arranging, which I like to refer to as “sledgehammering our way through the code”, until we reach the bottom of the code and the test runs through without errors and becomes green. Naturally, it’s only green because we do not assert anything yet. This changes in the next step.
Asserting with stateAsString()
We assert the state of the object under test, or whatever object the method returns, as a simple string.
We can either use the toString method if it contains the entirety of the state, or write a dedicated stateAsString method on that object to indicate that this method is only intended for Approval Testing.
In general, I’d recommend using the dedicated stateAsString method not to interfere with changes that may get introduced along the way to official toString methods.
A stateAsString method could look as follows:
String stateAsString() {
    return "name: " + this.name + ", age: " + this.age + ";
}
If we cannot define a stateAsString() method on the result value because it is a framework-specific class, we can still create it inside the test class as a static method:
private String stateAsString(ResponseEntity<Object> result) {
    return "body: " + result.getBody() +
           ", "status code: " + result.getStatusCode();
}
Initially, we don’t know yet what the stateAsString() method will return. This is why we start by simply asserting an empty string against the state as a string:
assertEquals(“”, unitUnderTest.stateAsString());This will inevitably lead to the test finally failing for the right reason. We want that to happen: we can now simply take the output of the test comparison as is and place it in the empty string of the assertion method.
assertEquals(“name: Olly, age: old”, unitUnderTest.stateAsString());Now we run the test again and it will pass.
Running Test Coverage
The final step before the cycle repeats is to run test coverage and see how much code was covered by that test. We always try to cover as much code in one go as possible. Test coverage can be found in IntelliJ e.g. if we click on the 3 dots next to the “run” button:
You also need to make sure that all the packages for which coverage should be shown are included in the test configuration:

Once we run these tests with coverage, we can find on the left side 3 colours indicating coverage:
green: covered by tests
red: not covered by tests
yellow: covered at least once, but not with every possible combination.
Our goal is to get to cover as much as possible, or have a good understanding why some parts of the code are still yellow or even red (e.g. due to unreachable code).
We get additional information about class, method, line, and branch coverage in the window that opens when we run coverage, as can be seen in the following screenshot:

Any branch not covered by a test becomes the target for the next test. We simply adapt a couple of parameters to reach those branches without losing too much brain capacity to think the algorithm through, and repeat the DAAARt coverage cycle until we are confident enough that our tests cover enough to be able to start refactoring.
Example
In the video below I show how to write a first manual Approval Testsuite, step-by-step. You can find the solution on the branch manual-approval-testing in the codebase.
Combinatorial Explosion
It is a good idea to practice such a manual technique in order to have it ready should you encounter an untested legacy method and need to refactor and extend it without breaking it in the process.
However, a method with lot’s of input parameter combinations can make it very cumbersome to cover all the branches with tests. That is why tools like ApprovalTests exist. In a future article, I will show how to employ this tool too.
It builds on the same ideas introduced here, so it’s a good idea to practice the concepts first before moving to such a tool.
Conclusion
Testing legacy code is not trivial. By employing Approval Testing, we can circumvent the issues of analysing code by simply asserting whatever the code returns, and then mutating input values until we covered all branch combinations.
These tests form the basis for further refactoring endeavours by providing an effective safety net that can be kept for the entire time of the legacy code rejuvenation.
Just remember the 5 steps involved: DAAARt 🎯
Define which method to test
Act
Arrange
Assert
Run test coverage
In a next article, I will show how to employ libraries to streamline the process of writing Approval Tests.
Resources
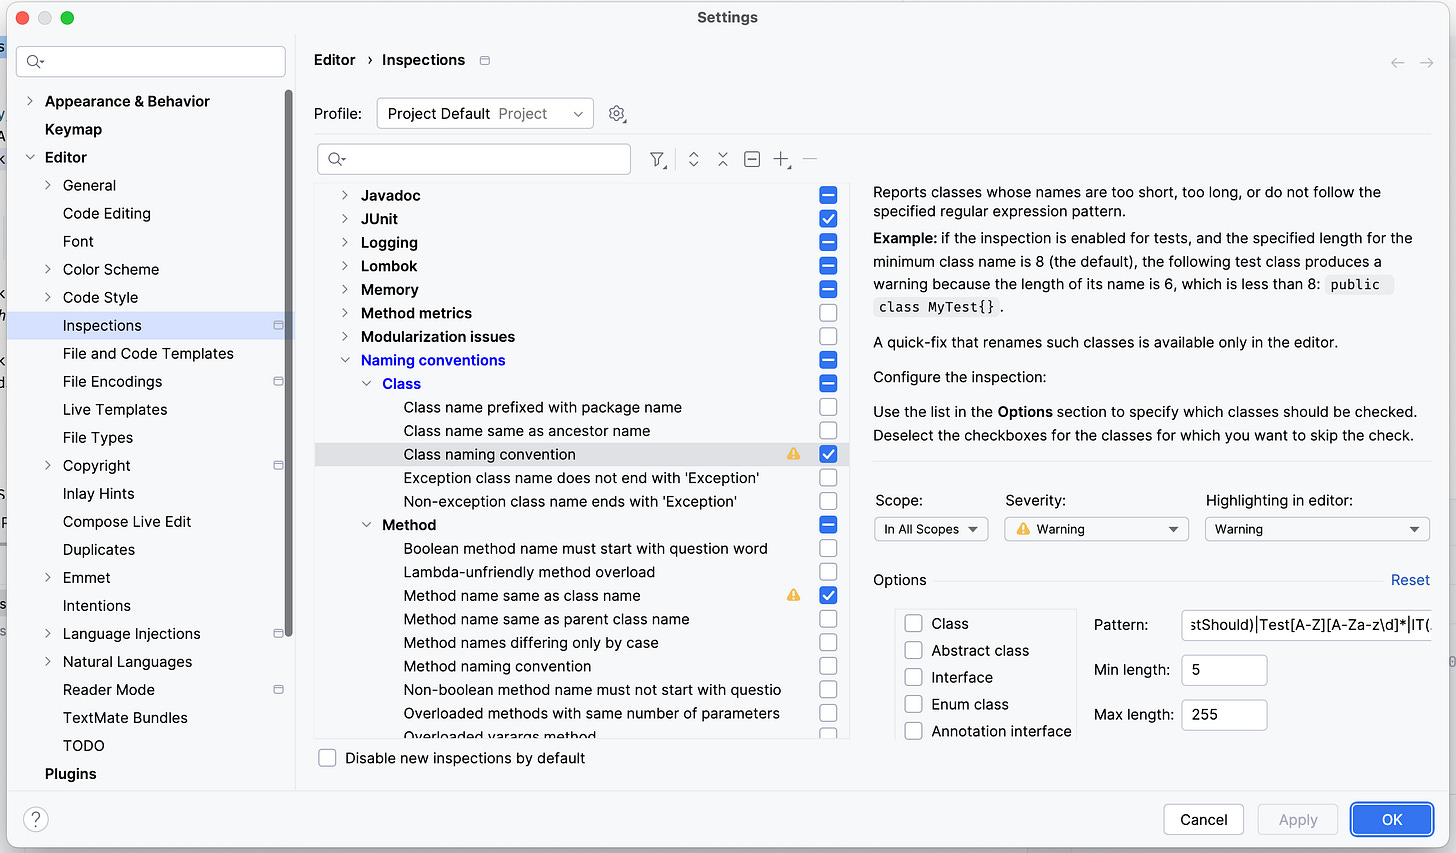
To get rid of the yellow test name, you can change the test name pattern in IntelliJ to
[A-Z][A-Za-z\d]*(Test(s|Case)?|Should|TestShould)|Test[A-Z][A-Za-z\d]*|IT(.*)|(.*)IT(Case)? in the following menu:
To effectively refactor Legacy code, we need to have a specific goal towards we want to move our design. Our O’Reilly course “DDD, EventStorming, and Clean Architecture” can help with that, as it introduces Domain-Driven Design and how to implement Aggregates in Hexagonal and Clean Architecture.
If you want to learn how to effectively separate concerns in Legacy code and move your application towards a better design, you could also have a look at our on-premise, remote or hybrid workshops Modern Software Architecture Design Patterns and Untangle Your Legacy Code with Domain-Driven Refactoring, where we dive into the presented topics in much greater detail.
To effectively learn how to identify code smells and refactor them, check out our workshop on Clean Code.


